PrompteryxBeta
    ⌘K
    PlatformSupport
    Menu
    IntroductionInstall Desktop & extensionQuick StartPlatform Overview
    OverviewWhat you can makeAI Browser Agent in the chatModels and AutoConnectorsSchedulesProjectsExplore and publishingShare linksMemory and SkillsPersonal agent (beta)Welcome, settings and skinsPlans, credits and top-upsPrompteryx DesktopGroups (pilot)Phone app (early access)
    OverviewCreating WorkflowsTesting & DebuggingScheduling
    OverviewGetting StartedCommandsRecordingSettingsStructured OutputParallel AgentsTips & Best Practices
    OverviewInstallationSidebar AgentUsing Attached FilesExecute on Current TabExporting to Visual Studio
    Overview
    OverviewOpen PageClickClick CoordinatesFillExtract TextScreenshotWaitPress KeyFocus ElementBlur ElementSelect TextHighlight ElementSet ViewportGet Bounding BoxScrollHoverSelect OptionAssertionsCookiesEvaluate JavaScriptExample Workflows
    OverviewPrompteryx Browser AgentOpenAI
    OverviewSchedule TriggerWebhook Trigger
    OverviewGoogle SheetsGoogle CalendarConnect Hub (3,000+ apps)Example Workflows
    AI Vision SettingsChrome Automation ProfilesCloud BrowserBrowser Profiles & Persistent ContextVideo RecordingExecution LogsSharing & CollaborationEdit History
    Selectors GuideVariables
    Start hereGet an API keyRun the AI browser agentDrive a cloud browserRun workflows from anywhereUse connected apps (Connect Hub)SDK (TypeScript)CLIMCP for AI assistants
    REST APIWebhooksMCP toolsCloud Browser APICloud Browser quickstartMigrate from Browserbasen8nZapierMake.com

    Need help? Contact Support

    1. Documentation
    2. Nodes
    3. Triggers
    4. Webhook

    Webhook Trigger

    Trigger Node

    Start workflows via HTTP requests from external services

    Overview

    The Webhook Trigger creates a unique URL that external services can call to start your workflow. When a request is made to this URL, the workflow executes with the request data available as variables.

    Live Once Saved
    The webhook URL starts accepting requests as soon as you save the workflow with a Webhook Trigger on it. To turn the webhook off, remove the Webhook Trigger and save again.
    Parameters
    Configuration options for this node
    method
    Select
    Required

    HTTP Method the webhook accepts: GET, POST, PUT, PATCH, DELETE or HEAD. Calls using any other method are rejected with 405.

    Default: POST
    authMode
    Select

    Authentication: None (public URL), Secret in X-Webhook-Secret header, Basic Auth, Bearer Token, or Custom Header

    Default: None (public URL)
    hmacPreset
    Select

    Verify Signature: check the payload was signed by GitHub, Stripe or Slack, or with a Custom HMAC (SHA-256 or SHA-1)

    Default: Don't verify
    responseMode
    Select

    Respond: Immediately (as soon as the run is queued) or When workflow finishes

    Default: Immediately
    responseCode
    Number

    Response Status Code to return

    Default: 200
    responseData
    Select

    Response Body: First entry (last node), All entries (last node), Custom body (templated), or No body

    Default: First entry (last node)

    Webhook URL

    When you add a Webhook Trigger, you'll get a unique URL like:

    https://www.prompteryx.ai/api/v1/webhooks/YOUR_WORKFLOW_ID

    • The URL is unique to your workflow (it embeds the workflow's ID, so save the workflow once first) — the ID is the value after ?edit= in the Visual Studio address bar

    • The Classic node properties panel shows the URL with a copy button and a ready-made cURL test command (choose Classic under Settings → Node Properties in Visual Studio)

    • Each request starts one run and counts towards your plan's workflow executions; requests are rate-limited per caller IP

    • With a Cloud Browser profile the run happens on Prompteryx's servers; with a local Chrome profile it waits for Prompteryx Desktop on your computer to pick it up
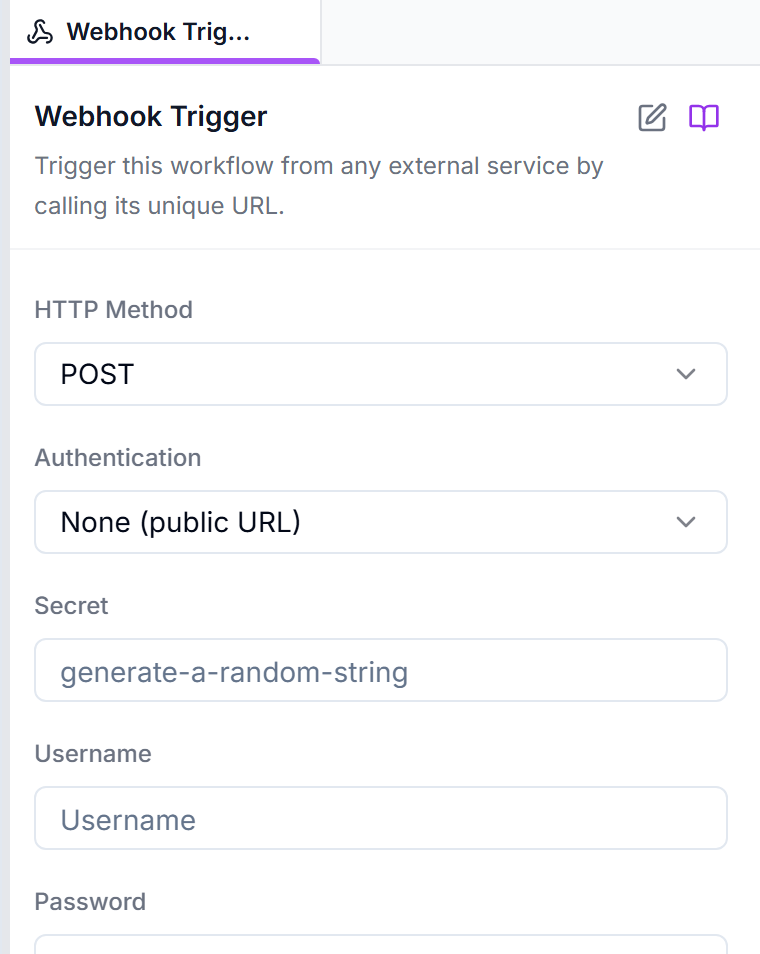
    The Webhook Trigger node's config panel: HTTP method, authentication mode, secret, username and password fields
    The Webhook Trigger config panel — pick the HTTP method and lock the URL down with a secret or basic auth.

    Request Data

    Data from the HTTP request is available in your workflow as the webhook variable:

    Request Body (parsed JSON, or raw text):{{webhook.body}} or {{webhook.body.fieldName}}
    Query Parameters:{{webhook.query.paramName}}
    Headers (lower-case names):{{webhook.headers.user-agent}}
    HTTP Method and arrival time:{{webhook.method}}, {{webhook.receivedAt}}

    Response Modes

    Immediately

    Returns a response as soon as the run is queued — by default { "success": true, "message": "Workflow execution queued", "executionId": "..." }. The workflow continues executing in the background. Best for webhooks where the caller doesn't need to wait for results.

    When workflow finishes

    Waits up to 30 seconds for the workflow to complete, then responds with the last node's output (or your custom body, which can use {{webhook.body.field}}, {{first.field}} and {{executionId}}). A failed run returns 500; a run still going after 30 seconds returns 504. Use for synchronous API-like behavior.

    Usage Examples

    Example 1: Form Submission Handler
    Process form data from a website
    Method: POST
    Response: Immediately (200 OK)

    Access form fields via {{webhook.body.name}}, {{webhook.body.email}}, etc.

    Example 2: Zapier Integration
    Receive triggers from Zapier workflows
    Method: POST
    Authentication: Custom Header

    Configure Zapier to send POST requests to your webhook URL with the header name and expected value you set on the trigger.

    Example 3: API Endpoint
    Create a custom API that returns data
    Method: GET
    Respond: When workflow finishes

    The workflow can extract data and return it as JSON in the response body.

    Authentication Options

    No Authentication
    Anyone with the URL can trigger the workflow. Use only for public endpoints.
    Secret in X-Webhook-Secret Header
    Callers send your shared secret in the X-Webhook-Secret header (or as a ?secret= query parameter).
    Basic Auth
    Require username/password via HTTP Basic Auth.
    Bearer Token
    Require an Authorization: Bearer <token> header.
    Custom Header
    Require a header you name (e.g., X-Api-Key) with an expected value.
    Verify Signature
    Separately from the options above, check that the payload was signed by GitHub, Stripe or Slack, or with your own HMAC secret. Requests that fail any check get a 401.

    Best Practices

    Always Use Authentication
    For production webhooks, always enable authentication to prevent unauthorized access. Your webhook URL can be discovered through logs or network inspection.
    Validate Input Data
    Add validation nodes early in your workflow to check that expected fields exist and have valid values. This prevents errors from malformed requests.
    Don't Share URLs Publicly
    Webhook URLs should be treated as secrets. Don't commit them to public repositories or share them in public forums.

    Related Documentation

    Schedule Trigger

    Time-based automation

    HTTP Request Node

    Make outbound HTTP calls

    Variables Guide

    Access webhook data